Configuring the Data Schema
This guide will help you set up all models required to run an e-commerce site.
Note
This guide is part of a tutorial series on building an e-commerce website powered by platformOS. Find the first part of the series here.
In platformOS, you are free to build any kind of data model you want. Defining the data schema is very similar to creating any other relational database. You can use one of the many tools to create a visual representation of the model. We chose dbdiagram.io.
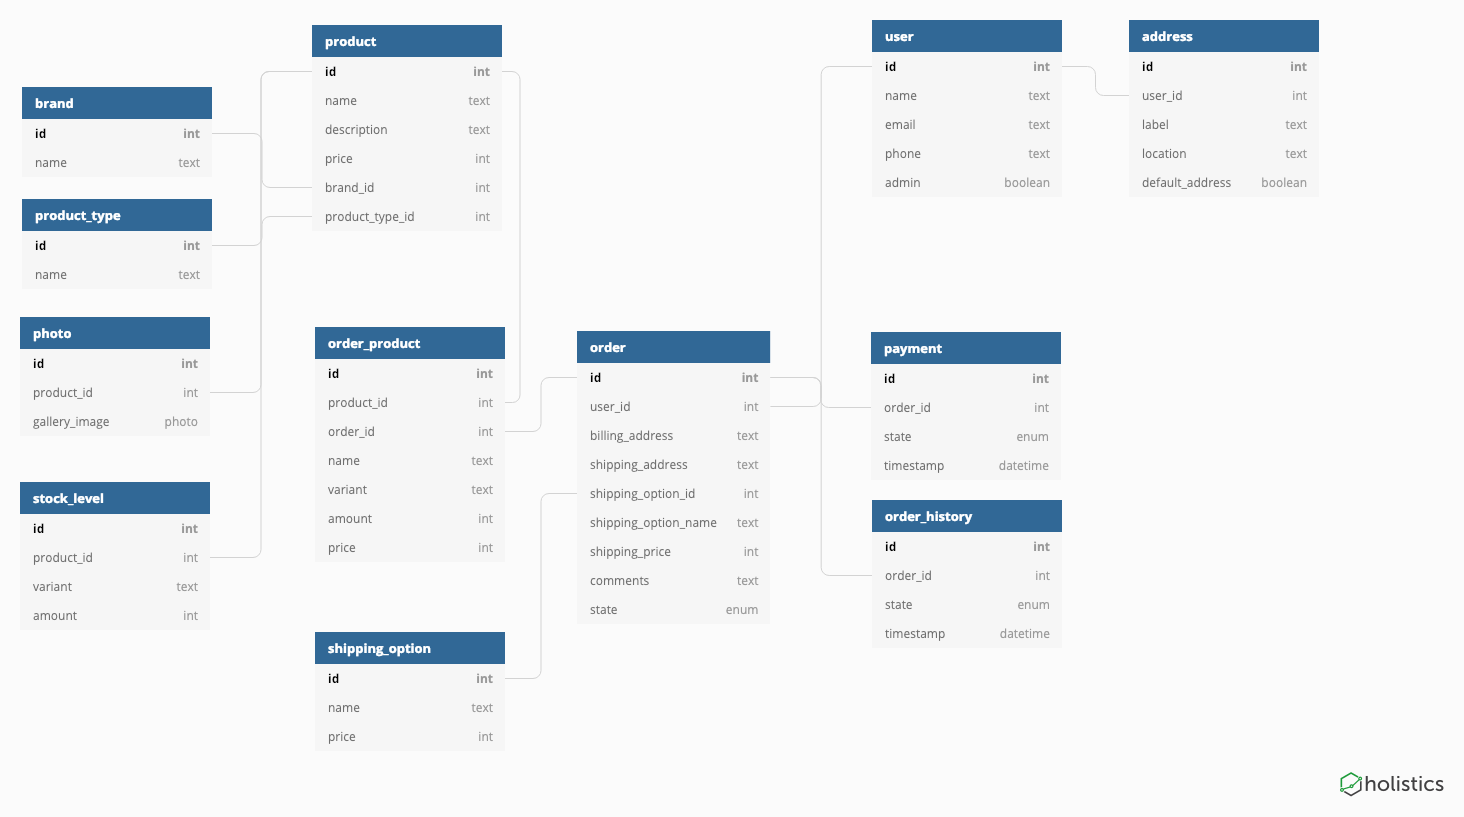
Your data schema will be based on three primary models:
userproductorder
On the platformOS side you will use User to map the corresponding model, and Model Schema to represent everything else.
Requirements
To follow this tutorial, you should be familiar with basic platformOS concepts, and the topics in the Get Started section. You should have set up the Instance for development, as described in a previous part of this tutorial series.
- platformOS Workflow
- Get Started
- Setting Up the Instance
- Creating a User profile
- Models and Model Schemas
- Custom Images
Steps
Creating the data schema varies from one project to another. In this case it’s a three-step process:
Step 1: Configure product models
Every T-shirt in your store will be described by product_type and brand. Additionally every product may have one or more photos attached. Finally, there are available variants of the product (in this case it’s T—shirt sizes). You will create stock_level that will hold information on the available amount of products in a specific variant (size).
app/model_schemas/product.yml
name: product
properties:
  - name: name
    type: string
  - name: description
    type: text
  - name: price
    type: integer
  - name: brand_id
    type: string
  - name: product_type_id
    type: string
Notes:
- Price will be stored as an integer, representing cents, so $1.00 is stored as
100. This helps to avoid problematic computations and rounding problems that sometimes happen with thefloatdata type. - External ids are integer numbers, but since variable types are important and
"100" != 100, it’s easier to store all IDs as strings.
app/model_schemas/brand.yml
name: brand
properties:
  - name: name
    type: string
app/model_schemas/product_type.yml
name: product_type
properties:
  - name: name
    type: string
app/model_schemas/photo.yml
name: photo
properties:
  - name: product_id
    type: string
  - name: image
    type: photo
    versions_configuration:
      thumb:
        width: 250
        height: 345
        transform: resize_to_fill
      mini:
        width: 500
        height: 800
        transform: resize_to_fit
      normal:
        width: 1500
        height: 1200
        transform: resize_to_fit
The photo model uses a special field type called photo. It helps automating upload and versions creation. You can read more on Custom Images here.
app/model_schemas/stock_level.yml
name: stock_level
properties:
  - name: product_id
    type: string
  - name: variant
    type: string
  - name: amount
    type: integer
Step 2: Configure user models
User is a built-in data type in platformOS. It has some predefined fields like name and email. You can extend User with additional Properties by using user profiles. The example below uses the default user profile to add a phone number field. You can learn more about creating a user profile in our documentation.
app/user_profile_types/default.yml
name: default
properties:
  - name: phone
    type: string
  - name: admin
    type: boolean
Every user will also be able to save multiple addresses to his contact book.
app/model_schemas/address.yml
name: address
properties:
  - name: label
    type: string
  - name: location
    type: string
  - name: default_address
    type: boolean
Note
As you’ve probably noticed we’ve omitted the user_id attribute. Every Model Schema in platformOS can be attached to another object via built-in customizable_type and customizable_id fields. You will be setting these values when creating forms.
Step 3: Configure order models
Last part of your shop data schema is related to orders created by clients. Every order can have multiple products attached to it and a shipping_option selected during checkout. Order is finished with payment. You will store the history of all payments for a given order (usually it will be just one, but you would want to log every interaction with the payments API as a separate entry). Finally, you will store order_history describing any changes to order state (received, paid, shipped, etc.)
app/model_schemas/order.yml
name: order
properties:
  - name: billing_address
    type: text
  - name: shipping_address
    type: text
  - name: shipping_option_id
    type: string
  - name: shipping_option_name
    type: string
  - name: shipping_price
    type: integer
  - name: comments
    type: text
  - name: state
    type: string
app/model_schemas/order_product.yml
name: order_product
properties:
  - name: product_id
    type: string
  - name: order_id
    type: string
  - name: name
    type: string
  - name: variant
    type: string
  - name: amount
    type: integer
  - name: price
    type: integer
You’ve probably noticed that some fields are duplicated (shipping) or not referencing other custom types by id (addresses). You want to ensure that order data is persistent and does not change after an order has been created. If at any point in time the admin removed the shipping option used in this order, or the user updated his address in the address book, the order would no longer represent the state at the moment of creation. Therefore, you should copy any piece of information prone to being manipulated, when the new order is created. Same logic applies to the order_product table where information on the ordered products is stored, along with the reference to the product itself. In case a product is removed or updated, you do not lose any data.
app/model_schemas/order_history.yml
name: order_history
properties:
  - name: order_id
    type: string
  - name: state
    type: string
app/model_schemas/payment.yml
name: payment
properties:
  - name: order_id
    type: string
  - name: state
    type: string
Note
The data diagram mentions a timestamp field for both the payment and the order_history data types. platformOS automates creation of such timestamps. Every object gets two built-in fields created_at and updated_at that are updated automatically.
app/model_schemas/shipping_option.yml
name: shipping_option
properties:
  - name: name
    type: string
  - name: price
    type: integer
Next steps
Congratulations! You have set up the data model that will power your store. You can now move on to building an admin section, where you will be able to add and modify T-shirts.